Battery switch on travel trailer function is crucial for managing your RV’s power. Understanding how your battery switch works is key to preventing dead batteries, electrical problems, and ensuring a smooth camping experience. This guide covers various switch types, safe connection procedures, troubleshooting tips, and maintenance best practices to keep your travel trailer’s electrical system running smoothly. We’ll explore everything from simple single-battery setups to more complex systems with solar panels and inverters, helping you master your RV’s power management.
We’ll delve into the specifics of different battery switch types – single, dual, and three-way – explaining their internal workings and comparing their advantages and disadvantages. Learn how to safely connect and disconnect your batteries, regardless of type (lead-acid or lithium), and master proper cable management. We’ll also cover troubleshooting common issues like no power, blown fuses, and corrosion, providing step-by-step solutions and a helpful flowchart for diagnosis.
Finally, we’ll discuss maintaining your battery switch to extend its lifespan and ensure reliable power for all your adventures.
Battery Switch Types in Travel Trailers
Choosing the right battery switch for your travel trailer is crucial for managing power and ensuring safety. Understanding the different types available helps you select the best option for your needs and setup. This section will Artikel the common types, their internal workings, and a comparison of their advantages and disadvantages.
Battery Switch Types
Travel trailers utilize several types of battery switches to control the flow of power from your batteries to the trailer’s electrical system. The most common types are single, dual, and three-way switches.
Single Battery Switch Operation
A single battery switch is the simplest type. It’s a single on/off switch controlling power from a single battery to the trailer’s electrical system. Imagine a simple light switch; flipping it “on” connects the battery to the trailer’s circuits, while “off” completely disconnects it. Internally, this switch is a basic electromechanical device, usually a lever that connects or disconnects the power path.
No complex circuitry is involved.
Dual Battery Switch Operation
A dual battery switch allows you to control power from two separate batteries independently or combined. This is common in trailers with a house battery (for appliances) and a starting battery (for the tow vehicle’s connection). The switch typically offers three positions: “Battery 1,” “Battery 2,” and “Both.” Internally, this switch uses a more sophisticated mechanism to route power from either battery, or both, to the output terminals.
Think of it as two separate switches within one housing, with a selector to choose the power source.
Three-Way Battery Switch Operation
A three-way switch provides even more control. It allows you to select between two batteries, combine them, or completely disconnect both from the trailer’s system. This offers the highest level of control and safety. Internally, this switch uses a more complex arrangement of contacts and selectors to handle the three possible power configurations and the “off” position.
It’s essentially a combination of the functionality of a single and dual switch.
Comparison of Battery Switch Types
| Type | Number of Batteries | Functionality | Advantages/Disadvantages |
|---|---|---|---|
| Single | One | On/Off control of a single battery | Simple, inexpensive; Limited flexibility |
| Dual | Two | Independent or combined control of two batteries | Flexibility to use one or both batteries; More expensive than single |
| Three-Way | Two | Independent, combined, or complete disconnection of two batteries | Maximum flexibility and safety; Most expensive option |
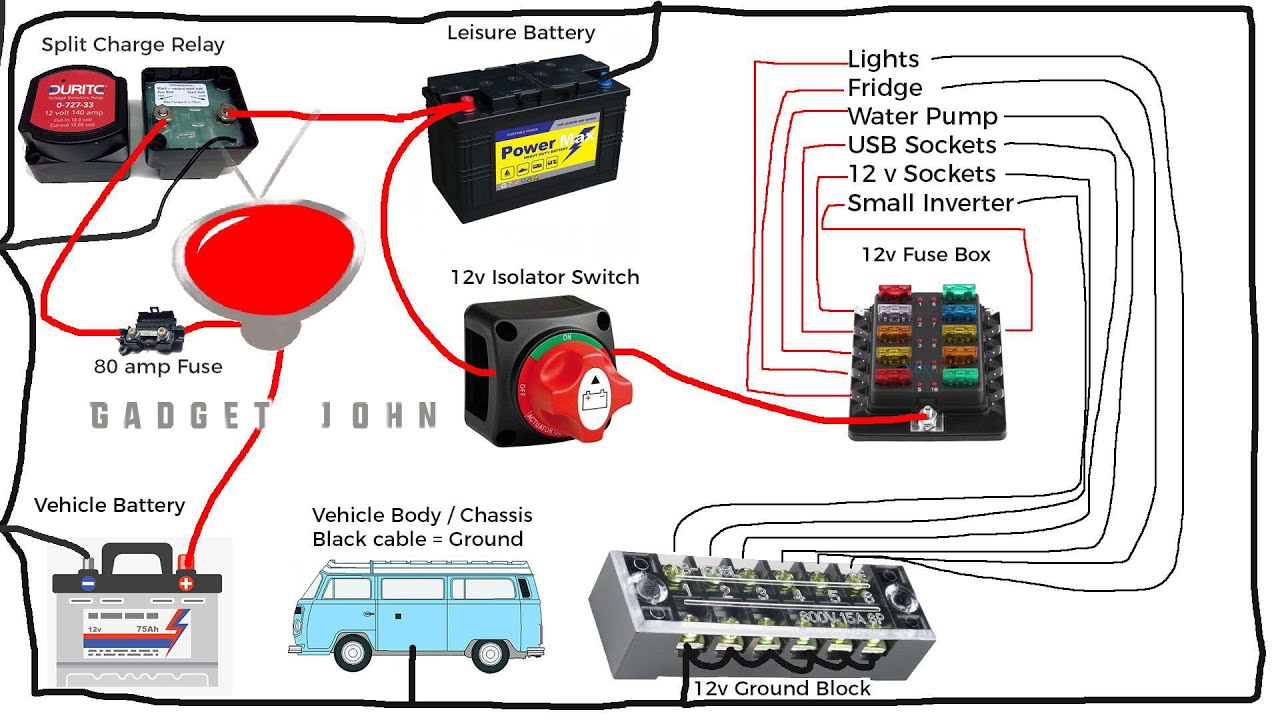
Battery Disconnect Switch Role
A battery disconnect switch is a crucial safety feature. It completely isolates the batteries from the trailer’s electrical system, preventing parasitic drain. Parasitic drain refers to the slow but constant drain of battery power caused by small loads like clocks, alarms, or poorly isolated circuits even when the trailer is not in use. A disconnected battery prevents this drain, ensuring your batteries are fully charged when you’re ready to use your trailer again.
It also helps to prevent accidental shorts or fires. The internal workings are similar to a simple on/off switch, but its purpose is dedicated to complete disconnection for safety and preservation of battery power.
Troubleshooting Common Battery Switch Issues
Your travel trailer’s battery switch is a crucial component, controlling the flow of power to your appliances and systems. Problems with this switch can leave you stranded without lights, refrigeration, or other essential functions. Understanding common issues and troubleshooting steps will help you quickly diagnose and resolve problems, ensuring a smooth and enjoyable camping experience.
No Power to the Trailer
A common issue is a complete lack of power to your travel trailer. This could stem from several sources related to the battery switch. Addressing these possibilities systematically is key.
- Check the Switch Position: Ensure the battery switch is in the “ON” position. This seems obvious, but it’s often overlooked.
- Inspect the Switch for Damage: Look for any visible signs of damage to the switch itself, such as cracks, burns, or loose connections. A damaged switch will need replacement.
- Test the Battery: Use a multimeter to check the voltage of your trailer battery. A low or dead battery will prevent power from reaching the trailer’s systems, regardless of the switch position. A fully charged 12V battery should read around 12.6V.
- Examine Wiring and Connections: Inspect all wiring connections to the battery switch for corrosion, loose connections, or broken wires. Clean any corrosion and tighten loose connections. A visual inspection is often sufficient, but using a multimeter to test continuity can be more thorough.
- Check the Fuses: Both the battery switch itself and the trailer’s fuse box may have blown fuses. Replace any blown fuses with fuses of the correct amperage rating.
Blown Fuses
Blown fuses are a frequent symptom of underlying electrical problems in your travel trailer. Addressing the root cause is critical, not just replacing the fuse.
- Identify the Blown Fuse: Locate the blown fuse(s) in the fuse box. A blown fuse will typically be visibly damaged (burned or broken).
- Replace the Fuse: Replace the blown fuse with a fuse of the same amperage rating. Using a higher amperage fuse can lead to further damage and is dangerous.
- Determine the Cause: Don’t just replace the fuse; investigatewhy* it blew. A short circuit somewhere in the trailer’s wiring is the most common culprit. This might require tracing the circuit to identify the faulty component.
- Check for Shorts: Carefully inspect the wiring connected to the circuit protected by the blown fuse for any signs of short circuits (bare wires touching, damaged insulation). Repair any damaged wiring.
- Consult a Professional: If you can’t identify the cause of the blown fuse, it’s best to consult a qualified RV technician to prevent further damage.
Corrosion on Battery Terminals and Switch
Corrosion is a common enemy of electrical connections, causing poor conductivity and ultimately leading to power issues. Regular cleaning and maintenance are essential.
- Clean Battery Terminals: Use a wire brush or terminal cleaner to remove corrosion from the battery terminals. Apply a corrosion inhibitor or dielectric grease to prevent future corrosion.
- Clean Switch Connections: If accessible, clean the connections on the battery switch itself using the same method. Pay close attention to any visible corrosion.
- Inspect Wiring for Corrosion: Check the wiring leading to and from the battery switch for signs of corrosion. Clean or replace any corroded wiring.
- Tighten Connections: Ensure all connections are tight and secure. Loose connections can exacerbate corrosion problems.
- Prevent Future Corrosion: Regularly inspect and clean battery terminals and switch connections to prevent future corrosion buildup. A simple annual cleaning can prevent many problems.
Troubleshooting Flowchart for Non-Functional Battery Switch
Imagine a flowchart with the following structure:Start -> Check Switch Position (ON?) -> Yes: Proceed to Battery Test, No: Check Switch for Damage -> Battery Test (Sufficient Voltage?) -> Yes: Proceed to Wiring/Connections Inspection, No: Replace Battery -> Wiring/Connections Inspection (Corrosion/Loose Connections?) -> Yes: Clean/Tighten Connections, No: Check Fuses -> Fuses Blown? -> Yes: Replace Fuses & Investigate Cause, No: Check for Shorts -> Shorts Found?
-> Yes: Repair Shorts, No: Consult Professional -> End
Battery Switch Integration with Other Systems: Battery Switch On Travel Trailer Function
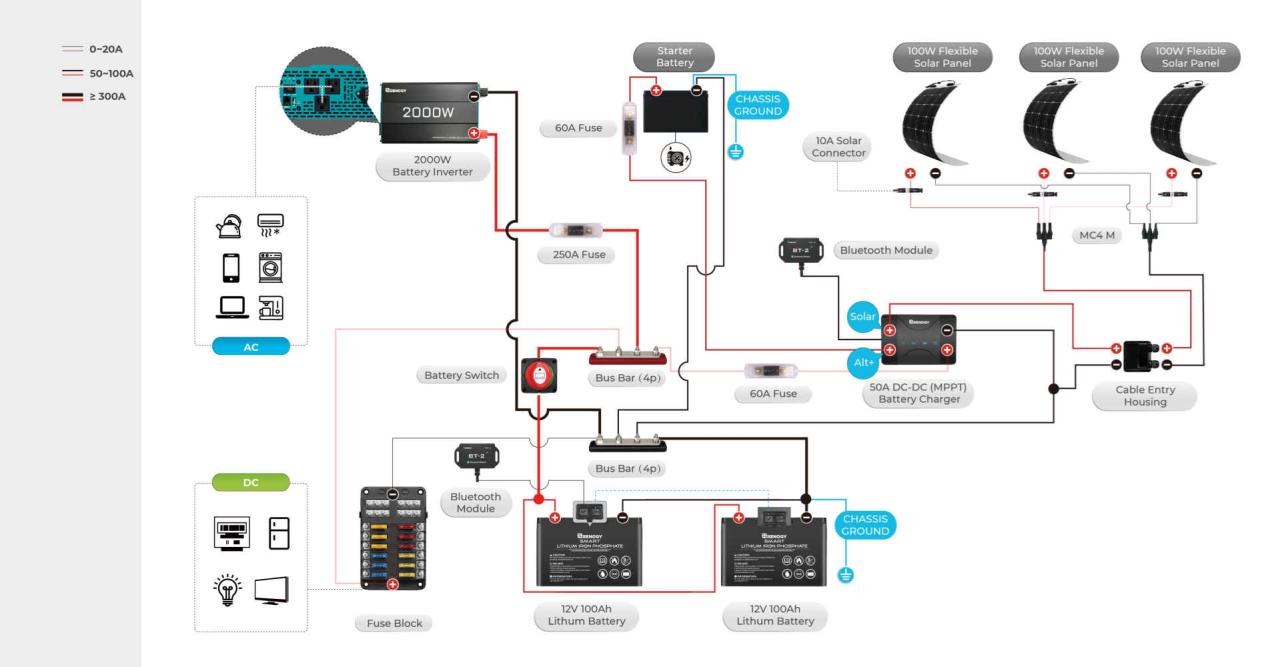
Your travel trailer’s battery switch isn’t an isolated component; it’s the central hub for managing power flow to various electrical systems. Understanding its interaction with these systems is crucial for efficient power management and preventing potential problems. This section details how the battery switch works in conjunction with solar panels, inverters, and converters.The battery switch acts as the main on/off control for your house batteries.
So, you’re an audiophile who travels? Awesome! Check out this guide on creating the perfect audiophile travel setup to ensure your ears are happy on the go. And while you’re planning your amazing trip, don’t forget about travel insurance! Getting Aon travel insurance is a smart move to protect yourself and your gear, ensuring peace of mind during your adventures.
Seriously, you’ll thank yourself later.
All other DC power-consuming devices in your RV draw power from these batteries, either directly or indirectly. The way the switch interacts with other systems depends heavily on its type (e.g., simple on/off, dual-battery switch, or intelligent battery switch).
Solar Panel Integration
Solar panels generate DC power that needs to be routed to your batteries for storage. A typical setup involves connecting the solar panel’s output to a charge controller, which then connects to your house batteries. The battery switch controls whether the solar charge controller can charge the batteries. With a simple on/off switch, turning the switch off prevents solar charging.
More sophisticated switches might allow for charging even when the house battery bank is switched off, providing a “trickle charge” function for maintaining battery health. A dual-battery switch would typically allow charging of both battery banks independently.
Inverter Integration
Inverters convert DC power from your batteries to AC power for running appliances that require alternating current. The inverter’s input is directly connected to the house battery bank. The battery switch acts as the master control, turning the inverter on or off by controlling the power supply to it. If the switch is off, the inverter won’t function.
A properly wired system should prevent the inverter from drawing power from a battery bank that is not selected.
Converter Integration
Converters transform 120V AC power from your campsite hookup (or generator) into lower-voltage DC power for charging your house batteries and supplying power to 12V DC devices. The converter usually has its own on/off switch, but its operation depends on the AC power source being available. The battery switch does not directly control the converter; however, it manages the DC power flowfrom* the batteries that the converter charges.
A properly designed system will prevent the converter from discharging the batteries when the battery switch is turned off.
Diagram of System Connections
Imagine a simple diagram:(Imagine a block diagram here. Each block would represent a component: Solar Panels, Charge Controller, Battery Switch (clearly labeled with its type if applicable), House Batteries, Inverter, Converter, and AC Outlets/12V Outlets. Arrows would indicate the direction of power flow. For example, Solar Panels -> Charge Controller -> Battery Switch -> House Batteries. Another arrow would go from House Batteries -> Inverter -> AC Outlets.
Another from AC Inlet -> Converter -> House Batteries. Another from House Batteries -> 12V Outlets)
Always disconnect the negative (-) battery cable before working on any electrical components in your travel trailer. This is a critical safety precaution to prevent accidental shocks or short circuits.
Ensure all wiring connections are properly secured and insulated to prevent shorts and fires. Consult a qualified RV technician if you’re unsure about any aspect of the wiring.
Comparison of Battery Switch Integration
A simple on/off switch offers the simplest integration, but lacks flexibility. A dual-battery switch allows for independent control of two battery banks, offering greater flexibility, especially when integrating solar panels. Intelligent battery switches offer the most advanced integration, allowing for automatic charging prioritization and load management, optimizing the use of your power sources. For example, an intelligent switch could prioritize solar charging during daylight hours and then switch to shore power when available.
A dual-battery intelligent switch would provide this functionality for two separate battery banks.
So, you’re an audiophile who travels? Awesome! Check out this guide on creating the perfect audiophile travel setup to ensure your listening experience doesn’t suffer on the road. Remember to protect your valuable gear with comprehensive travel insurance; getting Aon travel insurance might be a smart move, offering peace of mind while you’re exploring new soundscapes.
Don’t forget to pack your headphones carefully! Enjoy the journey and the music.
Selecting the Right Battery Switch
Choosing the correct battery switch for your travel trailer is crucial for safe and reliable power management. The wrong switch can lead to undersized wiring, blown fuses, or even a fire. This section will guide you through selecting a switch that meets your specific needs, considering factors like battery count, amperage requirements, and solar integration.Picking the right battery switch depends heavily on your trailer’s electrical setup.
A simple single-battery system will have different needs than a complex setup with dual batteries and solar panels. Understanding your power demands is the first step to choosing the correct switch.
Battery Switch Selection Decision Tree
This decision tree helps you navigate the process of selecting the appropriate battery switch. Follow the steps to identify the best fit for your travel trailer’s electrical system.
- How many batteries do you have? If one, proceed to step 2. If two or more, proceed to step 3.
- Single Battery System: You’ll need a simple on/off switch, possibly with a disconnect function for safety. The amperage rating should exceed the maximum draw of your appliances.
- Multiple Battery System: Do you have a solar charging system? If yes, proceed to step 4. If no, proceed to step 5.
- Multiple Batteries with Solar: You’ll need a switch capable of handling the combined amperage of your batteries and solar input. A combination switch that allows for individual battery selection and combined use is ideal.
- Multiple Batteries without Solar: You’ll likely need a switch that allows you to isolate batteries or combine them for increased power. Consider a switch with multiple positions to select which batteries are in use.
Calculating Amperage Requirements, Battery switch on travel trailer function
Accurately calculating your amperage needs is essential to prevent overloading your system. This involves considering the current draw of each appliance and the total combined draw. Remember, you always need a switch with an amperage rating
higher* than the maximum expected draw.
For example: Let’s say you have a refrigerator drawing 10 amps, an air conditioner drawing 15 amps, and a water pump drawing 3 amps. The total amperage draw is 28 amps (10 + 15 + 3). Therefore, you would need a battery switch with at least a 30-amp rating (or higher, allowing for a safety margin). Consider using a larger switch to accommodate future additions or upgrades.
Amperage (A) = Power (W) / Voltage (V)
This formula allows you to calculate the amperage draw of any appliance if you know its wattage and the system voltage (typically 12V in a travel trailer). For instance, a 120-watt light uses 10 amps (120W / 12V).
Examples of Battery Switch Configurations
Here are some examples illustrating how to select a switch based on different setups. These are simplified examples and the actual requirements may vary.
| Setup | Number of Batteries | Solar | Recommended Switch Type | Minimum Amperage Rating |
|---|---|---|---|---|
| Basic Camping | 1 | No | Simple On/Off | 20A |
| Extended Stay | 2 | No | Dual Battery Isolator | 50A |
| Off-Grid Living | 2 | Yes | Combination Switch with Solar Input | 100A |
Remember that these are just examples. Always consult with a qualified electrician or RV technician to ensure you choose the correct battery switch for your specific needs and local regulations.
Mastering your travel trailer’s battery switch is about more than just turning power on and off; it’s about understanding your RV’s electrical system and ensuring its long-term health. By following the guidance provided – from choosing the right switch for your setup to performing regular maintenance – you can avoid costly repairs, prevent frustrating breakdowns, and enjoy worry-free power on all your trips.
Remember, a well-maintained battery switch is the key to a happy and powered-up camping experience!
Top FAQs
What happens if my battery switch is left in the “off” position?
Leaving the switch off completely disconnects the batteries from the trailer’s electrical system, preventing any power draw and protecting against parasitic drain. However, you won’t have any power to appliances or lights.
How often should I inspect my battery switch?
Inspect your battery switch at least once a month, checking for corrosion, loose connections, and any signs of damage. Before each trip is even better!
Can I use any type of cleaning agent on my battery switch?
No, use only battery terminal cleaner specifically designed for this purpose. Avoid harsh chemicals that could damage the switch.
What size fuses should I use with my battery switch?
The appropriate fuse size depends on the amperage rating of your battery switch and wiring. Consult your owner’s manual or a qualified electrician.
